Last Weekend’s Production of The Quiet Man

Posted in The Quiet Man on May 28, 2012 by stevenjmclean

A couple of weeks ago, I last blogged on the progress of the design and construction of a production that I was engaged to design the set for.   Maurice Walsh’s The Quiet Man  loaded into the Winterset High School Miller Auditorium last Sunday (May 20) and “teched” Monday through Thursday.  It opened on Friday, May 25 with an evening performance, performed Saturday matinee and evening and closed with a Sunday matinee .   The play was produced by the Winterset Stage.  Run by a husband and wife team, the company is newly formed and this was the first full-length production that they had produced.  The fee was typical for this small type of community theatre organization and really no more than reimbursed me for the gas expended for the 70-mile round-trip commute that I made over 12 times over the course of building, painting, transporting scenery, attending production meetings, tech rehearsals and the like.  I wasn’t in the project for the money.  Having read the script and learned a little about the company, it was an experience that I hoped to find interesting and enjoyable and I hoped that the small talents that I could bring to the project would be of benefit to the company and the town.

Winterset is the birthplace of the actor John Wayne.  Every year the town hosts a celebration of his birth.  This year, the play The Quiet Man was a part of that celebration (as was the movie that John Wayne starred in of the same name and based (somewhat loosely) on the same story.  The play was produced in cooperation with the town of Winterset and with the John Wayne Birthplace Trust.

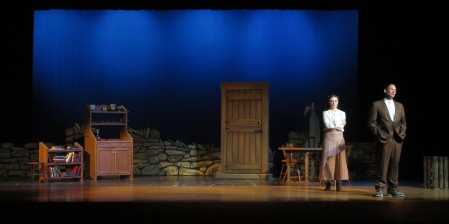
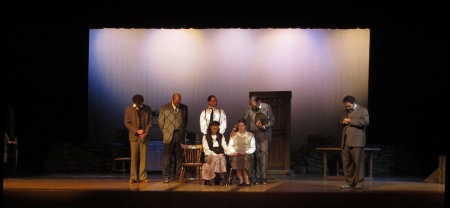
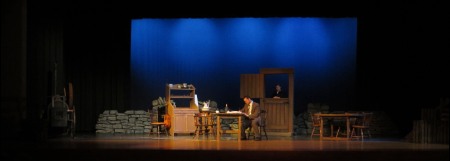
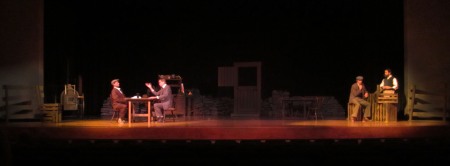
I posted the initial sketch in an earlier post.  Following are photos from the final dress rehearsal:

Sean’s cottage opens the show.   The set is a unit set.  All of the set pieces, much of the set props and most of the set dressing  (even though they may be of tangential or non-important to the scene) appears onstage in this initial image.

Several scenes are played out in front of the main setting using set props either already in place or pulled from the set behind.  In this case, the wake of Joan Hyland’s father, which takes place in Joan’s home, occurs on the forestage and is represented by pulling 3 chairs from the upstage area and isolating the lighting to the apron.

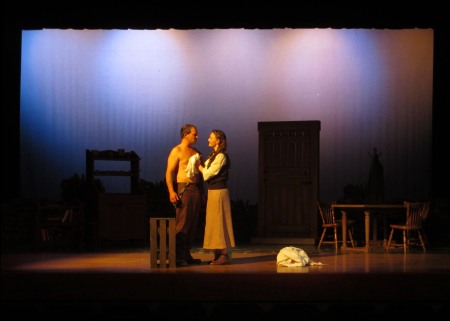
This is a later scene in Sean’s cottage in which Joan and Sean are reconciled after Sean writes a moving suicide note to Joan and botches the suicide attempt itself.  The script called for Joan to witness the attempt through a cottage window.  We combined the function of the window with the “dutch” style door. This further maximized the use of the door unit and reduced the need for an extraneous window that would have further cluttered the stage and further defined a space that needed to be kept somewhat nebulous because it needed to function as so many differing locals.

In the pub, Red Will proposes the marriage of his sister, Ellen Roe to Paddy Bawn (who has not-so-secretly been pining after her) as a ploy (ultimately unsuccessful) to convince Joan Hyland to marry him (and thereby assure him control of the land left to her by her father). This is another scene played on the forestage.  In this case, the table from Sean’s cottage is used SR with 2 chairs from Sean’s cottage and  a stack of crates SL that has been there throughout and used as a table and a place to “perch” earlier in the scene is used as a bar in the tavern.

Later that evening Paddy Bawn arrives at Red Will’s house to woo Ellen Roe.  This scene uses the SL table from Sean’s cottage and retains the “hutch”.  The wash basin on the wash basin table SL of the hutch is only used in this scene.  Note that the pitcher is now on the shelf below the basin after Red Will washed up on entering the  scene.

During the intermission, the basin and wash stand are removed from SL of the hutch and the bookshelf is placed SR of the hutch.  This is anticipation of the need for the bookshelf in Paddy Bawn’s cottage in Act II (although the first scene of Act II takes place in Red Will’s home at the reception following Paddy Bawn & Ellen Roe’s wedding.)  Ellen Roe is a somewhat reluctant bride (as is evident, I think, in the staging) but she sees marriage to Paddy Bawn as the lesser of two evils (the other being remaining as housekeeper to her scheming brother)

The first scene in Paddy Bawn’s cottage follows immediately.  The lighting designer has created the presence of a window facing the audience through which Paddy describes a view of the ocean.  Notice that the SL table has been rotated on axis to suggest another local.

In another key scene played on the apron, Paddy Bawn and Ellen Roe bond after the birth of one of their colts.  Note the crate, moved to this location by the actor playing Paddy Bawn at the top of the scene from its place throughout the play on the SL side of the proscenium.

In this later scene in Paddy Bawn’s cottage some small elements of set dressing (a display of flowers and a tablecloth) show the feminizing touch that Ellen Roe has brought to the residence.  Paddy’s friends  (who have not been happy with his liaison with Ellen Roe mostly on account of her scheming brother) are brought around, first by her “touches”, then by her baking and finally by her insistence that Paddy serve his companions whisky instead of tea.  It doesn’t hurt that they also find out that Paddy is to be a father.

In yet another scene played on the forestage, two fences which have been framing the stage throughout the play are brought to center by two of the cast and turned around to reveal the here-to-unseen whitewashed backs (or fronts) of the fences.  Ellen Roe is conspicuously absent from the scene because she is disgusted by the fact that her brother has not paid her dowry to Paddy Bawn and her husband seems to her weak in his lack of initiative in securing it.

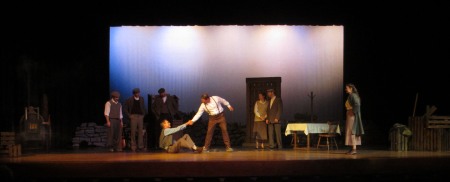
Though Paddy’s horse won the Dublin Horse show, Paddy Bawn returns resolved to get Ellen’s dowry, not because he needs the $100£ but because Ellen seems to need him to best her brother by getting it.  After getting the money, Ellen and Paddy burn it in a steam engine driving a thresher that has been onstage right throughout the play.  A fight ensues between Red Will and Paddy Bawn, with Paddy besting his brother-in-law who has bullied everyone in the town throughout the play.

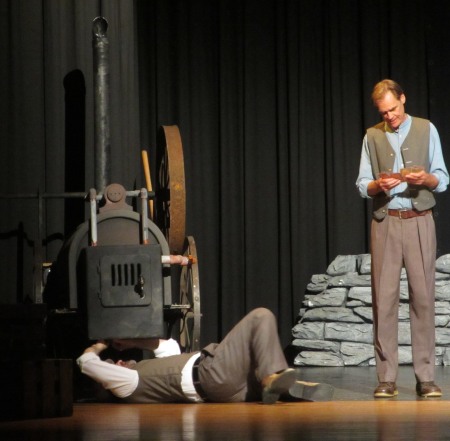
The steam engine appears in an earlier scene when Red Will is negotiating it’s use with its owner Tobin.  Because the fire-box of the steam engine is critical to the final scene of the play, it was an essential scenic element.   Early optimism that the rural nature of the Winterset area would mean that this prop could be readily found, proved to be overly optimistic.  That, coupled with the discovery that  such devices were enormous, lead to the necessity to construct something to represent this important element.  I adapted a wagon found onstage (used by the Winterset High School drama department for some unnamed production) by creating a tank shaped of MDF & sheet metal.  A few PVC water and sewage pipes and fitting created the “greeblies” that added verisimilitude and functionality to the device.  I installed a smoke machine and a Le Maitre fire effect to the fire-box.

That’s enough for now! Have fun!  Be safe!

SJM

Building Scenic Units Quiet Man: 2

Posted in The Quiet Man on May 14, 2012 by stevenjmclean

Wednesday, April 3

Building the Doorway

After dropping my son off at school, I returned to my garage/shop to begin building the doorway with the materials that I had purchased on Tuesday.

The materials cost $160.37 and included the following:

  • 5 lb – 3″ drywall screws
  • 8 – 1x6x10′ #2 (quality) boards
  • 4 – 1x6x12 #2 (quality) boards
  • 1 – 1x8x10 #3 (standard) board
  • 4 – 2x4x8
  • 3 – 5/4x6x10 treated deck board

You may notice that I elected to purchase lengths that would clearly not fit within my vehicle (which can contain nothing longer than 8′).  These lengths were the most efficient lengths to minimize waste and they rode comfortably on  the roof rack on my Vibe.  I also elected to buy better materials for some parts of the project because the #2 (quality) boards were significantly better than the #2 (standard) boards (which in addition to knots, splits and warps, almost all had sarge sections of “bark”).

I began the assembly with the door frame.  I framed the reveal pieces of 1×6 and squared them up  before continuing by gluing and pneumatic finish-nailing the facings. (1×6 for the posts and 1×8 for the lintel)

At 11:00 am, I took a break and made another run to Menards.  The objective of this trip was to secure the materials that I would need to build the fence units. (which I wanted to have on hand, but which I, again, wasn’t expecting to use immediately.

The materials cost $82.49 and included the following:

  • 6 – 1x6x10 #2 (quality) boards
  • 4 – 1x6x8 #2 (standard) boards
  • 3 – 8′ landscape timbers (for fence posts)

Returning home, I continued building the door platform.  Since the door frame is meant to penetrate the frame of the platform to create a sturdy self-supporting door with no need of external support structures, I built the frame to the exact dimensions of the door frame.  I also built the door shutters.

Once these were complete, I turned my attention to constructing the table.  The dimensions of the top were adjusted as-per directorial request to 33″ x 33″ square.

Thursday, April 6

I began the day with another run to Menards.  This trip was devoted to the purchase of the hardware that I would need for the hutch and the door unit.

The materials cost $76.22 and included the following:

  • 1 – thumb latch gate catch
  • 4 – crystal hexagon knob
  • 4 – cabinet hinges
  • 2 – packages (2 ea) T-strap gate hinge
  • 2 – packages (3 ea) T-nuts
  • 5 gal – joint compound
  • 3 – 5/4x6x10 treated deck board

Returning home, I worked on paperwork until noon and then made my way down to Simpson College.  I needed to attend a faculty/staff meeting there at 3:00pm, but arrived early to pull furniture that I needed to borrow for Quiet Man:

  • 1 – 30″ x 54″ table
  • 1 – spindle “captain” arm-chair
  • 2 – “fruitwood”-finish spindle side-chair
  • 2 – dark finish spindle side-chairs
  • 1 – 21″x 21″x 36″crate
  • 1 – 21″x 21″x 24″crate
  • 1 – 15″x 15″x 24″crate
  • 1 – 5′ bench

Friday, April 5

After dropping my son off at school, I took another trip to Menards.  This was necessary because I forgot to pick up a few items of hardware and because, having learned that some hoped-for donations had fallen-through, I needed some paint and adhesives.

The materials cost $77.46 and included the following:

  • 1 – package (14 ea) 3/8″ x 2″ hex bolts
  • 4 – 3/8″ x 4″ carriage bolts
  • 1 – package (6 ea) fender washer
  • 2 – magnetic catch
  • 1 – 4″ barrel bolt
  • 1 gal – flat white paint
  • 1 gal – flat black paint
  • 1 gal – carpenter’s wood glue
  • 8 – 12 oz cans, expandable foam sealant

At home I bolted the door frame to the platform and installed the latch hardware and hinges to the doors and installed the hinges and knobs on the hutch.


I met with the Artistic Director from the Des Moines Social Club (a local community theatre) to pick up some stone wall scenic elements that the Artistic Director of  Winterset Stage had negotiated with them to borrow.    After some hassle with parking and some struggles getting the items out of storage, I returned to my garage with the units.  They are made of solid foam and measure 18″ deep by about 36″ high.  One unit is 90″ long and the other is 120″ long.  Imagine seeing a little Pontiac Vibe driving around Des Moines with these babies strapped to the roof!


Returning home, I spent the evening re-drawing the dry-stone rock ground row to incorporate these new elements.

Saturday, April 6

The day began attending my son’s band contest in Indianola.  On my way home, I picked up a bench from Simpson College that I plan on using for Divine Sister (another project that I am working on)

Returning home, I took another run to Menards to purchase the materials needed to build the rest of the ground row.

The materials cost $134.91 and included the following:

  • 3 – 1x4x12 #3 (standard) boards
  • 4 – 1x8x12 #3 (standard) boards
  • 1 – 1x6x12 #3 (standard) board
  • 3 – 2″ expanded polystyrene 4×8 sheet
  • 1 – 1 1/2″ expanded polystyrene 4×8 sheet
  • 2 – 1/4″ lauan 4×8 sheet

Returning home, I repaired the lighting on my trailer, replacing the  driver-side light which had been damaged over the winter.   Then I loaded  the Quiet Man scenery (door unit, hutch, bookshelves) onto it.

Sunday, April 7

I drove down to Winterset to drop the first load of scenery off there.  Since the Miller theatre is not available to us yet, we are painting in a temporary location known as the “Academy”.  The building is a retired high school building, repurposed for city offices.  The old auditorium is still mostly intact and it is there that we will be painting the set pieces and storing them until Load-In on May 20.

After dropping the scenery off, I attended a scheduled production meeting at the current Winterset high school building and returned home, dropping off my trailer in Indianola in preparation for taking the furniture that I pulled Thursday to Winterset on Monday May 7

That’s enough for now! Have fun!  Be safe!

SJM
Building Scenic Pieces for The Quiet Man: 1

Posted in The Quiet Man on May 7, 2012 by stevenjmclean

In the last post I hinted at the solution that I came up with for building the remaining (those that I didn’t have to cut) scenic elements for my design for The Quiet Man for Winterset Stage.  The challenges include having no available shop, having the work-space only available for 2 weeks prior to opening, the lack of  a Winterset lumber yard, the resulting $70-$90 per delivery fee and the 80-mile round-trip commute between my house and Winterset.

My solution was to construct the scenery in my 2-car garage.  It is not as bad as it sounds.  My garage as a result of my  nearly 30 years in the industry and remodeling 5 different homes is endowed with nearly any tool that I could possibly need. The only commute involved is the 8 feet between my coffee maker and the garage door.  The plan was simple.  I would create a list of materials and supplies needed to construct one or more of the units.  After dropping my son off at his high school, I would drive to the local big box store (In my case Menards) and pick up the supplies with my Pontiac Vibe which has a remarkable potential for hauling.

Building the Bookcase & Hutch

Monday:  April 30:

Using the orthographic drawings that I had already drawn (shown below)  as a guide, I created a cut list.  then I expanded that cut list into a list of the materials that I would buy.

This included:

  • 10 – 2x12x6
  • 10 – 1x4x6
  • 1 – 2x4x8
  • 1 – 1x6x6
  • 1 – 1x8x4
  • 1 sheet of lauan
  • 1 sheet of 3/4″ ply

After a morning meeting with the director of the project in Indianola (a 12-mile drive), I returned to the Des Moines Menards building supplies store to purchase the first load of lumber.  The total for this came to $138.06.  I elected to purchase much of the material in 6′ lengths so that much of it would fit within my Vibe.  Wile the area behind the front seats and the closed hatch is less than 6′, the passenger seat unfolds and up to 8′ lengths of lumber will fit while allowing the hatch to close. This left the sheet stock (1/4″ lauan & 3/4″ ply) to ride ratchet-strapped to my roof rack.  I learned that while Menard’s stocks most lumber in lengths from 4′ up to 16′, their inventory is often limited in lengths below 8′.  I had to work with a yard man to get 2x12x12  lumber lengths (from a totally different section of the yard) and cut them down to get my 2x12x6.  That took quite a while.  My visit was further lengthened by the need to establish a tax exempt account with Menards (which was done at an electronic kiosk next to the customer service desk).

At home, I unloaded and began constructing the bookcase and the hutch.  I started with the 2×12 end frames.  The bookcase required cutting the 2x down to length and angling the top using a power-miter box.  The bottom was profiled with a “jigsaw”.  Since the hutch end-frames were to be constructed with two widths of 2×12, I cut each half independent of the other and biscuit-joined them together after cutting.  I also biscuit-joined the counter (also 2 widths of 2×12) at the same time gluing and clamping all 3 pieces and setting them aside until cured.

Next, I cut all of the shelves for the bookcase and hutch.  The bookcase required 3, while the hutch required 2.  All of the shelves for both units are 36″.  So as to achieve a sense of accomplishment, I assembled the shelf unit, marking and pre-drilling 1/8″ holes in the end-pieces and using 3″ drywall screws to secure the shelves in their proper places.  The resulting shelves are remarkably sturdy and didn’t require the 1×4 diagonal that I had expected to need to install to keep it steady.

I proceeded to cut all of the remaining stringers for the hutch carcass, including the decorative head-board for the back of the top shelf.  I knocked off a 5:oo.

Tuesday, May 1:

I began the morning by purchasing the materials that I would need to build the door unit.  Even though I didn’t think that I would get to begin building it on that day, I wanted to make sure that I had the materials at the ready if I did, and I needed 3″ drywall Screws to finish assembly of the Hutch.

The next challenge of the day was to cut 3/4″ off the width of the 2×12 shelves and the glued up 2×12 counter.  Not having a table saw, I created a Rube Goldberg table saw

by mounting one of my circular saws under a sheet of 3/4 ply set on a pair of saw horses.  While hardly as precise as and lacking safety features that are found on a real table-saw, this contraption enabled me to perform ripping operations on stock that would be impractical on any of the hand or bench tools that I own.  Once ripped to width, I glued and stapled (well really finish nailed having apparently left my pneumatic 1/4″ crown stapler at school) the back-boards to each.

I also ripped the lower cabinet shelf support and the drawer glides and glued and screwed them to the end-panels. Once installed, the end-panels were marked, pre-drilled and all of the stringers and shelves installed with 3″ drywall screws.

I cut the cabinet shelf from 3/4″ ply and the back of the cabinet from 1/4″ lauan.  Rather than use my home-brew table-saw for this, I used a circular saw and a custom-made saw guide.  By carefully aligning the edge of the guide to the marks indicating the cutting-line, and clamping it securely to the stock I am able to make precise cuts from large sheets of plywood.  You can see from the photo above and left that a scrap of 2×12 under the stock lifts the blade above the “table” (actually some 2x stock spanning between a pair of saw horses) and prevents the blade from cutting into the surface supporting the plywood.

The functioning drawer was easily assembled as a 1×4 framed box with a 1x 4 1/2″ (true) drawer front.  The bottom of the drawer is 1/4″ lauan.

The cabinet doors were more of a challenge.  I used my router-table and specialty rail-and-stile router bits to create the frames.  The matching profiles that the pair of bits can form on the 1x create the decorative half-round edge and form a secure glue-joint.  The router bits also create a groove which holds the 1/4″ lauan panel.

That’s enough for now! Have fun!  Be safe!

SJM
Update: The Quiet Man

Posted in The Quiet Man on May 3, 2012 by stevenjmclean

Over the past week I have continued working on the designs for THE QUIET MAN.  The play unfolds in a variety of locals: Sean’s cottage, the O’Danaher’s kitchen, Paddy Bawn’s Cottage, Joan Hyland’s parlor, outside of the church, a pub, the Dublin horse show, a field, and a few other locations.  This suggested a simple unit setting where  simple scenic elements that can be moved  slightly , with certain specific props or used in a different way can represent the variety of locals without protracted scene shifts between each scene.  The director was also drawn to the Irish landscape and wished to have some suggestion at the back of the stage.  She confessed to me that this was at least in part a desire to see the actors in front of a background that was not black drapes.  While the stage itself is painted black, the apron is blond wood.

After doing my site visit, I learned the dimensions and the peculiarities of the Henry C. Miller auditorium.  the space has a 42′ wide by 16′ high proscenium’.  It has  29′  of space upstage of the plaster line and a 12′ (at its deepest) curved apron.  It does not have a fly system but has 3 dead-hung borders, a main drape and 2 travelers on track and 3 pairs of Rotodrapers on tracks for masking,  3 permanent electrics and a white bounce drop in the back of the stage.

Following are some additional limitations:

  • Load-in is the Sunday  before our Friday May 25 opening
  • The company does not have a scene shop, nor does it have tools
  • A space described as the “Academy” will be available for construction and painting no earlier than 2 weeks before opening.
  • Winterset is a 40-mile one-way commute from my residence
  • I am responsible for building and painting the scenery myself (I presumably have a master-carpenter who is currently as student at a local college, but with whom I have been unable to communicate)
  • Winterset has a local True Value Hardware store, but no lumber yard.  Delivery fees are over $50 per load to Winterset
  • Oh, the budget is $500.

With this in mind, I broke down the show into the individual units and put a price tag on each element, in the same way that the shops do when design scenery for Des Moines Metro Opera.  The unit cost estimates were as follows:

  • 32′ x 18′ Black Scrim- $1000
  • Mountain Ground Row–$248
  • Hills Ground Row — $ 240
  • Floor Cloth for apron — $500
  • Stones on floor — $81
  • Dry Stone Wall Ground Row — $267
  • Small Stone Wall — $46
  • Falling Fence — $15
  • 2 Proscenium Horse Fences — $35
  • Door — $147
  • Cupboard — $76
  • 2 Tables — $68
  • Act II Bookcase — $36
  • Steam Engine –$75
  • Paint, Fasteners & Adhesive — $150
  • 6  Chairs — borrow
  • Stool — borrow
  • US Bench — borrow

If the reader has been tallying this all up, then you know that the butcher’s bill for this runs to almost $3000! Clearly, this exceeds the available financial resources.  The next step is to start cutting.  This is a process with which I am also familiar with on account of my design work for the Des Moines Metro Opera.  As a side note:  I detest the euphemism “value engineering”  and prefer that less obtuse term “cutting”.

  • Cut the Following ( I didn’t have the space or time or labor to construct them anyway) saving almost $2070:
    • 32′ x 18′ Black Scrim- $1000
    • Mountain Ground Row–$248
    • Hills Ground Row — $ 240
    • Floor Cloth for apron — $500
    • Stones on floor — $81
  • Borrow the Following saving almost another $200:
    • 12′ section of Dry Stone Wall from a local theatre company — $89
    • Borrow 1 table — $34
    • Assemble Steam Engine from found and borrowed items — $75

These compromises bring the projected cost of the scenery below the $800 budget.  Visually, the biggest impact will be that rather than having a vista of distant hills and mountains, the setting will be backed with a white bounce drop that the Lighting Designer will need to light in an artistic fashion (probably less of a challenge than doing justice to the series of groundrows) and the ever-present blond apron floor.

Next time:  the trials of building scenery in my 2-car garage.

That’s enough for now! Have fun!  Be safe!

SJM
Two Set Designs

Posted in Design and Production on April 23, 2012 by stevenjmclean

Well,  my apologies for the break in the thread on the posts about lighting.

I just undertook the design of settings for 2 different projects this past week.

On Tuesday, April 17th I met with the director of what is thought to be the Midwest premiere of the irreverent musical Divine Sister.  The show is produced by Stage West  (a local community-based theatre company) and opens on June 15.  Rehearsals begin the first week of May so there is some urgency to getting the set design done.  After my meeting with the director, I visited the Des Moines Civic Center  and the Stoner Theatre (the venue in which the production will be produced).  This theatre is a small black box venue wedged beneath the seating of the main auditorium.  I last designed for the space over 14 years ago when I designed sets and lights for Picasso at the Lapine Agile for the then-fledgling Stage West theatre company (coincidentally over an earlier sabbatical).  Since my drawings from so long ago are locked on 3 1/2″ floppy disks and held for ransom in unopenable Mini-Cad 4  encoded files, I decided to begin more-or-less from scratch.  Armed with a tape-measure and an incomplete plan of the space of  questionable accuracy, I spent a couple of hours there, taking measurements and marking them down on the plan.

Tuesday evening, I spent  transferring the dimensions to the VectorWorks drawing that I began for this project.

Wednesday, April 18th I began working with the Stoner Theatre plan and drawing ideas for the scenery for Divine Sisters.

Wednesday afternoon, I met with the music director and supervisor of the Henry C. Miller Auditorium at Winterset High School in Winterset, Iowa where I took measurements necessary to begin drawing the theatre’s plans from scratch.  This is the venue for the other production that I committed to designing scenery for.  Winterset Stage (a very new community-based professional theatre company based in…you guessed it: Winterset) is producing Maurice Wash’s Quiet Man.  The play is based upon the award-winning 1952 John Ford film featuring John Wayne.  Winterset is the birthplace of John Wayne and the play is being produced in conjunction with this year’s  John Wayne Birthplace  trust’s John Wayne birthday celebration.  This year also marks the 60th year since the release of the namesake film.  The play opens May 25.

I spent Wednesday evening committing my measurements to a VectorWorks CAD file that I began for the Quiet Man project.

Thursday, April 19,  I continued drawing on the Divine Sister project.  During the afternoon, I had to make my way down to Indianola to work with my colleagues on making student, faculty and staff design assignments for the 2012-13 school season.

Friday, April 20, I had an 8:30am meeting in Indianola between Simpson College’s Academic Dean and the faculty’s of the music and theatre departments.  The subject was finalizing the 2012-13 school year’s production schedules and coming to agreement concerning the expectations and level of support that the Theatre Department is to provide to the Music Department in the staging of their two annual Opera productions.  At 11:00,  I met with the Director, Lighting Designer, and Costume Designer for the Quiet Man project.  Turns out, that they are my colleagues from Simpson College.

Saturday, April 21 was rainy.  Although I really need to get some yard work done, I spent the entire day researching and drawing for The Quiet Man.

Sunday, April 22 (yesterday) was, likewise very cold and wet in Central Iowa.  I spent the day cleaning up drawings for The Quiet Man and posting the drawings to the Drop Box folder that the director created for the Winterset Stage production.  At 6:30pm I drove to Winterset to attend the read-through of  The Quiet Man.

Well,  that explains how I have kept myself busy since my last post.  Unfortunately, the upcoming week will probably be similarly occupied since once the designing is concluded, I will need to be directly involved in the production of the scenery for both projects.  Perhaps I will find the opportunity to post on my progress.

That’s enough for now! Have fun!  Be safe!

SJM

DMX 512 Protocol Standards 3: Splitters

Posted in Lighting on April 19, 2012 by stevenjmclean

My interest in DMX 512 networks were peaked during one of the several workshops that I attended in late March at USITT 2012 in Long Beach.  I wrote last week in the  2nd installment on DMX 512 of the role that DMX splitters might play in such a network.  To recap, since a passive Y-configuration does not work with DMX 512 because of the tendency of signal reflection to degrade the signal, resulting in potentially disastrous unreliability, the only way to split a wired DMX-512 signal is to use an optically isolated splitter which allows a single input but delivers multiple cloned but optically isolated outputs.  As a bonus, the splitter boosts the signal.

However,  Selecting the right splitter for your installation requires a little research and consideration. DMX-512 is a very mature standard now over 20 years after its establishment, and most manufacturer’s products should work with one another.  Below are brief descriptions of some of the common models produced by the most established manufacturers of DMX-512 splitters:

Pathway Connectivity Solutions:

9016 Repeater from /www.pathwayconnect.com

  • 9014:  1 isolated input/ 1 passive through-put/ 8 output with 5-pin XLR ($1000 list)
  • 9014-3:  same as 9014 except featuring 3-pin XLR ($1000 list)
  • 9016:  same as 9014 except with connectors on front of unit. ($1000 list)
  • 9016-3:  same as 9014-3 except with connectors on front of unit. ($1000 list)

Goddard Design:

Goddard FD HUB5 photo from goddarddesign.com

  • FD CC 05: 1 isolated input/5 grounded output with 5-pin XLR ($560 list)
  • FD CC 95a:  1 isolated input/1 isolated output (user-groundable) /4grounded output ($600 list)
  • FD ISO 5:  1 isolated input/ 5 isolated output (user-groundable) ($1000 list)

Doug Fleenor Design:

Doug Fleenor Design 1211-5 from www.dfd.com/

Doug Fleenor Design 1211-5 from http://www.dfd.com/

  • 123-5: 1 isolated input/5 grounded output with 5-pin XLR ($610 list)
  • 125-5:  1 isolated input/5 output with 5-pin XLR ($870 list)
  • 1211-5:  1 isolated input/ 11 output with 5-pin XLR ($1800 list)

ENTTEC:

ENTTEC RD S8 from http://www.enttec.com

  • RD S4: 1 isolated input/4 grounded output with 5-pin XLR ($420 list)
  • RD S8:  1 isolated input/8 output with 5-pin XLR ($735 list)
  • 70572 D-Split:  1 isolated input/ 2 output with 5-pin SLR/ 2 output with 3-pin XLR ($110 list)
  • 70575 D-Split:  1 isolated input/ 4 output with 5-pin XLR ($110 list)

Many other  DMX splitters  are available from other manufactures including Levitron, Elation Pro Lighting, Eternal Lighting Company (ELC).  Other theatrical equipment manufacturers including Martin, Chauvette, Strand, ETC, etc…probably also supply quite satisfactory devices.   As you can see from the list prices, there is a wide range of price points.  While a cheap device might be as satisfactory as an expensive one, there is some truth to the adage “you get what you pay for”.  This wisdom was shared with me by several of my colleagues from the Stagecraft Mailing List.

The major factor affecting price within a manufacturer’s line is the number of outputs.  Again, popular wisdom is that you should not skimp on outputs.  Once you determine how many you think you will need, choose the next larger size in your chosen manufacturer’s line.

That’s it for now! Have fun!  Be safe!

SJM

Barry Manilow Concert Lighting

Posted in Lighting on April 16, 2012 by stevenjmclean

So, It was my intention to follow-up the last post on DMX 512 with additional examination of  DMX512 networks and devices.   However,  serendipity, in the form of the opportunity to attend a Barry Manilow concert last Thursday (April 12) interfered with that plan.  Apart from the opportunity to revisit the songs that were playing on pop radio in my youth, it was a great chance to see if I could observe some of the things that I have been studying over the past several weeks in action.

You may recall that on my sabbatical leave I am investigating 21st-century lighting technology.  In addition to attending USITT in Long Beach a couple of weeks ago where I got to examine a lot of this gear up-close and attend workshops on the topic, I have been reading some related books.  I picked up Brad Schiller’s The Automated Lighting Programmer’s Handbook: second edition while at the conference and have been reading it the past week.

The concert set consisted of a fairly flat forestage, with a slight upstage elevation for the several musicians in the band.  At least 3 moving lights sat on the floor in the band area.  2 curving towers arched asymmetrically from the stage.  The SR tower was fitted with 8 moving lights and was both the taller of the two and was placed further upstage.  The SL tower was shorter, placed further downstage and carried 3 or 4 (it was hard to see from my house-right seating position) moving lights.  A large rear-projection screen hovered about 9 or 10 feet above the stage at the back of the band area.  Overhead, there appeared to be somewhere in the neighborhood of 50 fixtures (some movers, the rest standard fixtures with color changers or LED fixtures).  ladders  each carrying 4 moving lights hung from overhead down stage L and R.  At least one followspot from overhead followed Barry around the stage providing a bright top or high back light to him.  You can see the effect in the photo above in the bright pool of light in which he stands.  Frontlight was provided by conventional followspots from a high front balcony position.  2 were always on Barry when he was on stage.  Another 2 were used to light his backup singers when they were featured.

During each song, the content on the large overhead screen changed.  For “Old Songs”  this image (or a variation of it) provided a simple dynamic image.  The upstage area is bathed in a luscious purple-blue while the downstage featured a bright pink-red and vivid yellow-orange splash of color.  The towers are lit in a red wash.  The movers on both towers have circle gobos and slowly meandered around the stage in a languid “Ballyhoo”.  Other moving light effects that I observed in this concert included “Kicks” (all movers in a bank pointing down with shutters close and then, flashing on and panning up to overhead and blanking out, one at a time in a chase sequence) and “Stabs” (all movers blacked out and irised very tightly and strobing momentarily in a chase sequence).

The photo above from the cues for “Brooklyn Blues” clearly reveals the projection screen with an overall image of  the faces of buildings (presumably representative of Brooklyn).  You can also see the grand piano in its onstage placement that Barry played for many of his songs.

In the photo above, Barry sings the Ballad “This One’s For You”.  The 8 movers on the SR tower assume a configuration that was frequently repeated on this ballad-heavy concert where the Singer was often exhibiting his piano virtuosity.  All 8 focus on Barry’s back right.  Notice that the lowest couple actually light the floor to the SR of his feet and under the piano.  In this case, a couple of pale top-backlights light Barry, but also, unfortunately seem to accidentally glance across the top of the SR curved tower.  One of the most impressive moments of the began with a video projection of a young Barry Manilow projected on the large screen (broadcast-quality footage probably taken from one of his ABC specials).  After the first chorus, Barry joined in singing and playing the baby grand along with the archival video clip.

The concert ended with lavish projections of psychedelic tropical animations on the screen and vividly colored light from the rest of the rig for the show-stopping “Copacabana”

The photo at left captures the last moment of “Copacabana” and illustrates the range of color effects achieved by the lighting rig.

At one point in the concert Barry announced that he was going to perform the song “Can’t Take My Eyes Off Of You” a song that he claimed not to have performed publicly for some time and that he and the band had just worked up during the afternoon.  I was dubious owing to the slick production values of the concert up until that point, and assumed that it was either just part of the performance, or perhaps that they were recycling some segment from the recently closed Vegas long-run production.

As the song began with a the moving video projection seen at left, I originally thought that my suspicions were confirmed since my reading  suggested that the process of creating an effective series of cues such as I expected to see is a much more complicated task than the implied time-frame would have permitted.  However, I did notice that what appears in the still at left to be the movers an the SR arch tower pointing toward the audience was those same movers moving in some pseudo-random Ballyhoo, but no light was coming out of them.  I suspect that this was a consequence as Brad Schiller warned of  a cue sequence having been recorded in tracking mode and then being run following a cue block that is tracking different values for the shutter or iris than the cue in memory when it was created.                  

Almost instantly, the cue changed to the even less aesthetic cue at right.  In this cue, the washes that light the arch towers also illuminate the screen.  Without content, the screen is very present and not at all interesting or attractive.  All of the overhead movers are frozen, whilet the movers on the arch towers continue to writhe and twitch, appearing to be trying to do something but having the shutters firmly preventing light from projecting onto the stage.

I feel fortunate to have witnessed what I perceive as this error and am pleased to have experienced this confirmation of Brad Schiller’s cautions about the unexpected consequences of badly planned tracking cues.

I regret not having seized an opportunity to examine the light board before the concert.  Considering the complexity of the rig, it probably was.   By the time the concert was over and the audience on the floor of the arena were streaming out, the crew had already begun breaking down the console so I had missed my chance.  The opinion of most lighting programers whom I have asked is that a mover-heavy concert rig is best driven by a GrandMA or a Hog. From where I sat, the console resembled a GrandMA to me (though I am hardly an expert at identifying consoles by sight).

For those of my readers who are dubious over the value to the students and administration of  the sabbatical system for professors, let me point out that the concert conflicted with the final dress rehearsal of the play that Theatre Simpson (the theatre department for which I am TD & Faculty Designer when I am not on sabbatical) produced this past weekend (April 13-15).  For that matter, the USITT conference itself conflicted with the work call for the same production.  These two facts serve to illustrate how the leave is an essential tool for the Design/Tech faculty member in a small liberal arts undergraduate program.  Unless the department has very generous financial resources and/or is situated in a location with  ample theatrical resources and without the flexibility that a sabbatical leave offers, it is impractical for a Design/Tech faculty member to engage in meaningful exploration outside of teaching and production duties.

That’s it for now! Have fun!  Be safe!

SJM

DMX 512 Protocol Standards 2: Exploring DMX Network Configurations

Posted in Lighting on April 13, 2012 by stevenjmclean
The earliest use of DMX512 protocol was for controlling dimmer racks as indicated by the diagram below:
This diagram illustrates the connection of 3 dimmer racks of 96 dimmers each to a single DMX512 universe from a control board.    Each dimmer will take 96 DMX channels for a total of 288 DMX channels.  Since a single universe offers  512 DMX channels there are still 224 DMX channels available on this universe.  Each dimmer rack counts as a single DMX device, therefore, this universe is capable of supporting another 29 devices (up to a total of 32)
Let us suppose that we have 3 additional DMX devices that we wish to control with the console.
The simplest, most straightforward way to communicate DMX instructions to the devices  is to daisy-chin them. This method has the disadvantage of requiring excessive lengths of DMX512 cable to feed signal from the dimmer rack (which is often remote from the stage lighting positions) to the lighting fixtures. However, the 224 extra channels of DMX are available to control these devices.  There is a wide range of DMX devices that could be used here including DMX Irises, Gobo Rotators, Color Scrollers, Automated Yokes, Moving Lights or LED fixtures.  Each type of device (even each model or manufacturer of each type of device) will require a specific number of DMX channels in order to function.  Notice that the diagram appears to indicate that the 3 DMX devices are some manner of moving lights.  According to Brad Schiller on page 20 of The Automated Lighting Programmer’s Handbook: second edition, such a fixture might require anywhere from 16 to 40 channels of DMX.  Assuming the higher number, no more than 5 such fixtures (requiring 200 channels of DMX) would be able to be run in this fashion on the remaining 224 available DMX channels in this universe. (regardless of the fact that this would only account for 8 devices out of the possible 32 allowed).

Another strategy for feeding signal to the DMX devices is to insert a DMX splitter near the board.  This does introduce an additional level of complexity, but the splitter’s optical isolation protects each segment (in the example: both segments) of the DMX512 signal path from electrical faults on the other branch(es).  Since the control board is normally visually coupled with the auditorium and lighting positions, this strategy stands to reduce the length of the cable run from the splitter to the first DMX device verses the previous example, while also making troubleshooting easier.

Alternatively, since most contemporary control boards are capable of out-putting multiple universes of DMX channels, another strategy involves taking advantage of a 2nd universe of DMX in order to control the non-dimmer DMX devices.  This strategy retains the advantages of the preceding method of splitting the first universe, while it eliminates the extra device.  Notice that this strategy would also permit as many as 12 DMX devices each requiring 40 DMX channels on the 2nd universe.

Each DMX device must be assigned a DMX Address in order for the console to address it.  As a rule, the address for each device will be the first DMX channel necessary to address it.  In the example above, the address of the first dimmer rack would probably be 1.  The second dimmer rack would have a DMX address of 97, and the third dimmer rack would have a DMX address of 193.  Meanwhile, in the single-universe examples, the first DMX moving light might have an address of 300, the second an address of 340 and the third an address of 380.  On the other hand, on the two-universe example, the first DMX moving light must have an address above 512.  In this case, it might be assigned an address of 540, with the second addressed as 580 and the third an address of 620.  Notice that in all cases, address numbers for a subsequent device must begin no earlier than the number of DMX channels needed to address the preceding unit. Also notice that I have chosen a multiple of 10 for each DMX fixture address even though it requires the skipping of several potential DMX channels.  This is in the interest of making subsequent programing a little bit easier because DMX channel numbers will be more intuitive.

These addresses are set on and stored inside each device.  There are several ways that these addresses might be entered.  The method of assigning the address for a device depends upon the age, model and manufacturer of the device.  Various methods include:  DIP switches, Rotary Dials, LED display, and digital assignment through software or computer.

That’s it for now! Have fun!  Be safe!

SJM

DMX 512 Protocol Standards 1: Introduction

Posted in Lighting on April 11, 2012 by stevenjmclean

Early in the evolution of computer-controled light boards, each manufacturer used  proprietary equipment and protocols to communicate between the control board and dimmers and other lighting devices.  This lead to incompatibility between different manufacturers equipment.  It was in this environment that the United States Institute of Theatre Technology (USITT)  published a standard entitled “DMX512 – Digital Data Transmission Standard for Dimmers and Controllers”.  Spun off from a USITT Engineering Commission session at the 1986 USITT Conference  in Oakland, California, the publication was an effort to standardize  the communication of control boards and dimmers.  Minor revisions to that standard were published in 1990.

In 2004, the American National Standards Institute (ANSI) accepted the DMX512  standards.  ANSI is an organization of industry and government representatives that determine standards for the electronics industry in the US and represents the US in setting international standards.

In 1998 USITT transferred maintenance and supervision of the DMX512 protocol to the Entertainment Services and Technology Association (ESTA) Technical Standards Program. In 2011 ESTA merged with the Professional Lighting and Sound Association (PLASA) under the PLASA name.  PLASA remains the primary international body representing technologies and services to the event, entertainment and installation industries and retains supervision of the DMX512 standards.

As stage technologies developed that could be controlled by a lighting console, the DMX512 protocol has been used to communicate with those new devices as well as with dimmers.  DMX 512 is now used to control  gobo rotator, hazers and fog machines, gel changers, auto irises, color engines, moving lights, LED fixtures and other devices.

What is DMX512?  Some Vital Statistics:

  • DMX is an acronym for Digital MultipleX.  In engineering terms, DMX is an asynchronous serial digital data protocol.
  • a single DMX link  can provide 512 channels of control in a single Universe
  • Each channel is divided into 256 steps dividing a range of 0% to 100%
  • The DMX signal repeats intensity instructions for each and all of the 512 channels as many as 44 times per second.
  • all 512 discreet channels of a single DMX Universe  can be distributed over a single appropriate cable
  • Each Device contains a DMX in and A DMX through connector and devices are daisy-chained from one-to another
  • Only 32 Devices may be on a branch/each dimmer pack or lighting fixture or other DMX-controlled device with a microcontroller is considered a device
  • Additional branches may not be created with a standard Y
  • Additional branches of the same universe can only be achieved by using a DMX Isolated Splitter (an active device that permits the splitting of a single DMX feed so that into more than one feed each of which may serve up to 32 devices)
  • Each branch of DMX  must be terminated at the last device in the chain to ensure reliable operation.  Some devices self-terminate.  Other devices require a DMX 512 terminator that resembles an enlarged XLR plug.
  • Only standard-compliant connectors and conductors should be used to ensure reliable and proper operation of a DMX512 network.

The original version of the standard is quite specific about what type of cable and connectors were to be used to carry DMX 512 signal.  it specified the use of 120 or 100 ohm 1 or 2 twisted pair cable and a 5-pin XLR connector. Each wire has a specific hook-up and a specified function as indicated in the table to the right.   A cable constructed in this manner with no additional breaks or connectors has a maximum length of about 300 meters without the need to introduce a repeater (a device that boosts the signal).

While the standard is quite specific, a few individual equipment suppliers have produced equipment that fails to conform to the standards:

Since the original standard only has functions for the Shield Drain and Pair 1 Black and White wires(Pins 1, 2, & 3),  leaving Pair 2 Green and Red as spare (for future development of the standard), some vendors have found non-standard uses for the spare wires and connectors.  Some actually have one or more of these wires carry current or serve to provide feedback signal between proprietary devices.  These non-compliant fixtures  should not be used in conjunction with compliant equipment, since they may damage any DMX 512 compliant equipment.

Other suppliers have  opted to install 3-pin connectors on their equipment (in an attempt to save money by installing the less expensive connector).  In theory, this connector used in conjunction with wire of appropriate impedance and capacitance  (and otherwise compliant with the standard) should provide reliable service.  However since the most common cable used with this connector is microphone cable, and since microphone cable  fails to meet the standard outlined in the DMX 512 standard, users are likely to attempt to use sub-standard cable and are likely to experience unreliable operation.

The preceding provides the basic information needed to begin to understand the DMX512 standards.  Further reading and understanding would be necessary to be fully conversant with the protocol or to build, specify or trouble-shoot DMX512 networks.  Of especial interest is recent developments in wireless DMX and in DMX over CAT5 wiring.

Links:

Organizations:

Web Sites and PDFs for further study:

That’s enough for now! Have fun!  Be safe!

SJM

Cross-Country Driving to Attend the 2012 USITT Conference

Posted in USITT on April 9, 2012 by stevenjmclean

USITT Conference in Long Beach Convention Center

Thanks for bearing with this blog while I took a couple-weeks hiatus from the primary subject of technical theatre and lighting.  I just arrived back home Thursday evening after traveling to Long Beach for the 2012 USITT Conference.  Partially to save money, partially to visit my daughter, son-in-law and grandkids and partially just for the fun of it, I chose to drive.  I broke the trip up into two segments each way driving from Des Moines, Iowa to Grand Junction, Colorado, then Grand Junction, Colorado to Long Beach California…and vise verse.   Following are some of the basic statistics of the trip:

  • Total Round Trip Distance:  3443 miles
  • Total Gas Used:  122 gal
  • Average Gas Mileage: 28.22
  • Total Cost of Gas: $490
  • Driving Time: 50 hours
  • Average Speed: 69 mph
  • Route:  I-80/I-76/I-70/I-15

Some Observations That I Made Along the Way.

  • There is a spectacular 10 or more mile section of the westbound lanes of I-70  near Glenwood Springs, Colorado which pass through Hanging Lake Tunnel.  The road seems to cling to the south face of the mountain and  to cantilever over the eastbound lanes (which go around the mountain instead of through a tunnel)
  • I-70 Eastbound in Utah

    When I drove I-70 westbound through Utah, I did so in the dark.  Navigating that stretch of interstate at night was like riding Disney World’s Space Mountain roller-coaster.  The same stretch of highway eastbound in the mid-afternoon revealed a roadbed winding among a crazy-quilt of exposed rock strata escarpments.

  • I was struck by the brutal majesty of the landscape along I-70 and I-15 through  Utah, Arizona and Nevada.
  • Approaching Las Vegas on I-15, the city appears in a slight bowl about half-an-hour before you get to it.  On March 27th, from that initial vantage point, Vegas appeared to sit in an indentation and to be surrounded by a smudge of brown air.
  • White-out in Nevada

    It snowed much of my return trip along I-15 between Las Vegas and I-70.  At one point, the snow was so bad that I was experiencing near-white-out conditions.  Luckily the air temperature stayed above 32 degrees and the road-bed didn’t freeze!

  • The landscape along I-15 through much

    Landscape east of LA

    of California reminded me of the movie Holes.

  • On the return trip along I-76 through eastern Colorado and I-80 through Nebraska I must have passed thousands of fields with pivot irrigation systems.  I didn’t notice them so much on the western trip, but one field in Colorado caught my attention.  It was an arc of bright green along the highway and literally covered with hundreds (maybe thousands) of black cattle.
  • Iowa windfarm along I-80

    On both sides of I-80 through western Iowa is the remarkable and stunning testament to the quest for renewable, green energy in the form of forests of behemoth wind generation towers.  They loomed out of the mists and darkness on my westward journey, and stood  simultaneously windmilling in stark profile against the eastern sky.

  • Every improved rest stop that I had the fortune to stop at along the route was clean and well-appointed.  A far cry from the pit toilet rest stops of my youth.  Many of them seemed brand new…perhaps one of the most useful legacies of the economic stimulus package.

Speaking of rest stops, I made a disturbing discovery on this trip.  In my experience, roughly 80 percent of the men using the facilities at rest stop and gas stations exit without washing their hands.  I don’t know about you, but I become somewhat queasy at the thought of  where those things have been and the funkiness being left on the handles, products, counters, and currency along the way.  I wonder what their wives, girlfriends and mothers would say to them if they but knew.  Another pet peeve that I have is related.  I appreciate the fact that public facilities are gravitating to paperless drying methods for those who do wash their hands, and I applaud policies that require employees to wash their hands before going back to work. I just wonder what is wrong with this logic when I have to open a door handle with my newly cleaned hands in order to exit the facility…remembering that 80 % of the patrons have exited without washing hands already.  Yuk!

The truck traffic was less dense than I expected.    I don’t know if it was the route that I have very little experience with, the downturn in the economy, or changes in laws or rules governing drivers of big rigs, but  they also seemed more courteous and more mindful of the speed limit than has been my experience in year’s past.  On the other hand, my fellow vehicle drivers were often cause for concern.  As a rule the vehicle traffic drove faster than the big rigs.

My biggest gripe though was with what I consider the misuse of the left lane.  Often referred to as the “passing lane” I consider that it should be used predominantly by traffic that is overtaking slower-moving vehicles in the right lane.

One of my pet peeves is the motorist who has cruise control set for just lightly faster than the slower traffic and who just inches up or even maintains station off the rear corner of a semi or another vehicle in the right lane.  I believe that it in incumbent on that driver to make an aggressive effort to pass, even if he  must accelerate to 5 or more miles per hour over the speed limit to complete the passing maneuver.   That seems to be much safer than staying in the blind spot of the other driver and effectively blocking the road from other overtaking traffic.

Once the maneuver is complete, the driver should not continue in the left lane, but should return to the right hand lane, leaving adequate clearance between the other vehicle before doing so.  Once in front of the other vehicle, the driver who has passed  another is obliged to create a safe stopping distance between the vehicle he passed and himself, and should maintain a speed equal to or slightly faster than the vehicle that he passed.  Otherwise, he had no business passing in the first place.

Nor do I appreciate the driver who overtaking traffic in both lanes rides up and tailgates a driver in the left lane in an attempt to intimidate them into driving faster.  That is just irresponsible and likely to lead to catastrophe.

Then there is the ridiculous appearance of the Mazda 2  that followed me for about 50 miles on I-70 eastbound into Denver.  It appeared to have a face on it with the headlights serving as eyes, the vehicle emblem seeming to be a nose, and the grill resembling a hideous mouth with a demented rictus grin.  Positively an unnerving view mile-after-mile in the rearview mirror! Shudder.

That’s enough for now! Have fun!  Be safe!

SJM